Contents
1. Background
In a production environment, in order to improve page loading performance, build tools generally bundle the project code together, so that only a small number of JS files need to be requested after going online, greatly reducing HTTP requests. Of course, Vite is no exception. By default, Vite uses the underlying packaging engine Rollup to complete the module packaging of the project.
In a sense, project packaging for the online environment is a necessary operation. However, as front-end projects become more and more complex, the volume of a single packaged product becomes larger and larger, and a series of application loading performance problems will occur, and code splitting can solve them well.
Of course, in actual project scenarios, it is not enough to just use Vite’s default strategy. We will go one step further and learn various advanced postures of Rollup’s underlying unpacking to achieve customized unpacking. At the same time, I will also take you through the actual process. The case reproduces the common pitfall of Rollup custom unpacking – the circular reference problem. Let’s analyze the reasons for the problem and share some of our own solutions and solutions, so that everyone can have a deeper understanding of the code segmentation of Vite and Rollup. .
However, before the formal explanation, I would like to introduce you to several professional concepts: bundle, chunk, and vendor.
- Bundle: refers to the overall packaged product, including JS and various static resources.
- Chunk: refers to the packaged JS file, which is a subset of bundle.
- Vendor: refers to the packaged product of a third-party package, which is a special chunk.
2. Problems solved by Code Splitting
In the traditional single-chunk packaging mode, when the project code becomes larger and larger, it will eventually cause the browser to download a huge file. From the perspective of page loading performance, it will mainly cause two problems:
- It is impossible to load on demand, even code that is not needed for the current page will be loaded.
- The reuse rate of online cache is extremely low. Changing one line of code can cause the entire bundle product cache to become invalid.
Let’s look at the first question first. Generally speaking, the JS code in a front-end page can be divided into two parts: Initial Chunk and Async Chunk. The former refers to the JS code required for the first screen of the page, while the latter is not necessarily required. A typical example is routing components. Components that are not related to the current routing do not need to be loaded. After the project is packaged into a single bundle, both Initial Chunk and Async Chunk will be packaged into the same product. That is to say, when the browser loads the product code, it will load both together, resulting in many redundant loading processes. , thus affecting page performance. Through Code Splitting, we can split the code loaded on demand into separate chunks, so that the application only needs to load the Initial Chunk when loading on the first screen, avoiding redundant loading processes and improving page performance.
Secondly, the online cache hit rate is an important performance measure. For online sites, the server usually adds some HTTP response headers when responding to resources. One of the most common response headers is cache-control, which can specify strong caching for the browser, such as the following setting.
cache -control : max -age = 31536000
Indicates that the resource expiration time is one year. Before expiration, when accessing the same resource URL, the browser directly uses the local cache without sending a request to the server, which greatly reduces the network overhead of page loading. However, under single-chunk packaging mode, once a line of code changes, the URL address of the entire chunk will change, such as the scenario shown in the figure below.
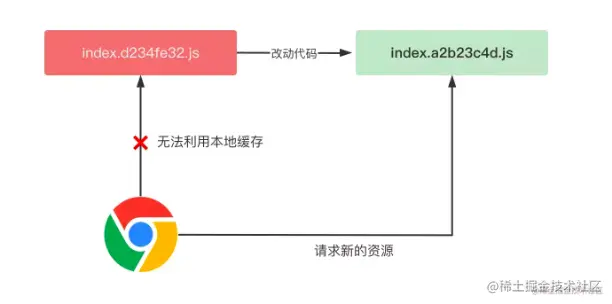
Since the build tool generally generates a hash value based on the content of the product, once the content changes, the strong cache of the entire chunk product will become invalid. Therefore, the cache hit rate in single-chunk packaging mode is extremely low, basically zero. After Code Splitting, code changes will only affect part of the chunk hash changes, as shown in the following figure:

The entry file references four components A, B, C, and D. When we modify the code of A, the only chunks that change are A and the chunks that depend on A. The chunk corresponding to A will change. This is easy to understand. The latter It will also change because the corresponding import statements will change. For example, the entry file here will have the following content changes.
import CompA from  './A.d3e2f17a.js'
// Update the import statement
import CompA from  './A.a5d2f82b.js'
In other words, after changing the code of A, the chunk product URLs of B, C, and D have not changed, which allows the browser to reuse the local strong cache and greatly improve the loading time and performance of online applications.
3. Vite’s default unpacking strategy
In fact, Vite already has an unpacking strategy built into it. Let’s take a look at how Vite’s default unpacking mode works.
In the production environment, Vite completely uses Rollup for construction, so unpacking is also done based on Rollup. However, Rollup itself is a tool focused on JS library packaging, and it is still lacking in the ability to build applications. Vite just complements the Rollup application. The ability to build is well reflected in the expansion of unpacking capabilities. Let’s first experience Vite unpacking through a specific project. I have put the sample project in the Gihub repository and can be downloaded for comparison and study.
Execute yarn run build in the project, and the following build information will appear on the terminal.
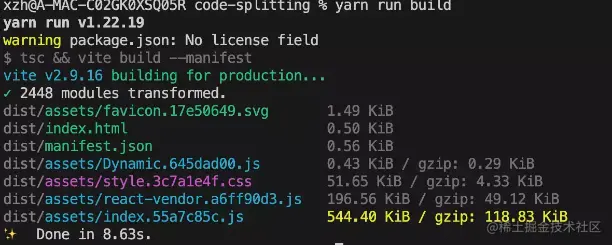
Next, let’s explain the structure of the product:
.
├── assets
│ ├── Dynamic. 645 dad00 .js     // Async Chunk
│ ├── favicon. 17 e50649 .svg    // Static resource
│ ├── index. 6773 c114 .js       // Initial Chunk
│ └── vendor .ab4b9e1f . js      // Third-party package product Chunk
└── index .html                  // Entry HTML
It can be seen that on the one hand, Vite has implemented the ability of automatic CSS code splitting, that is, one chunk corresponds to one css file. For example, index.js in the above product corresponds to one index.css, and the chunk Danamic.js loaded on demand also corresponds to A separate Danamic.css file is the same as the code splitting of JS files. This can also improve the cache reuse rate of CSS files. On the other hand, Vite implements the application unpacking strategy based on Rollup’s manualChunksAPI:
- For Initial Chunk, business code and third-party package code are packaged into separate chunks, which correspond to index.js and vendor.js respectively in the above example. It should be noted that this was the approach before Vite 2.9. In Vite 2.9 and later versions, the default packaging strategy is simpler and more crude, packaging all js code into index.js.
- For Async Chunk, the dynamic import code will be split into separate chunks, such as the above-mentioned Dynacmic component.
It can be found that the advantage of Vite’s default unpacking is that it realizes the separation of CSS code segmentation and business code, third-party library code, and dynamic import module code. However, the disadvantage is also relatively intuitive. The packaged products of third-party libraries can easily become bloated. , the size of vendor.js in the above example has reached more than 500 KB, and there is obviously room for further optimization of unpacking. At this time, we need to use the unpacking API in Rollup – manualChunks.
4. Customized unpacking strategy
For more fine-grained unpacking, Vite’s underlying packaging engine Rollup provides manualChunks, which allows us to customize the unpacking strategy. It is part of the Vite configuration. The example is as follows.
// vite.config.ts
export default {
  build: {
    rollupOptions: {
      output: {
        // manualChunks configuration
        manualChunks: {},
      },
    }
  },
}
manualChunks mainly has two configuration forms, which can be configured as an object or a function. Let’s take a look at the object configuration first, which is also the simplest configuration method. You can add the following manualChunks configuration code to the above example project.
// vite.config.ts
{
  build: {
    rollupOptions: {
      output: {
        // manualChunks configuration
        manualChunks: {
          // Package React-related libraries into separate chunks in
           'react-vendor' : [ 'react' , 'react-dom' ],
           // Package Lodash library code separately in
           'lodash' : [ 'lodash-es' ] ,
           // Package the code of the component library into
           'library' : [ 'antd' , '@arco-design/web-react' ],
        },
      },
    }
  },
}
In the object format configuration, key represents the name of the chunk, value is a string array, and each item is the package name of the third-party package. After the above configuration, we can execute yarn run build to try packaging.
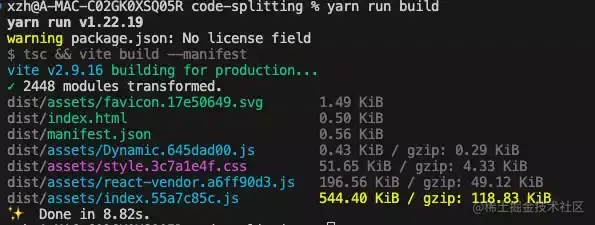
As you can see, the original large vendor file has been split into several small chunks that we manually specified. Each chunk is about 200 KB, which is an ideal chunk size. In this way, when the third-party package is updated, only the URL of one chunk will be updated, rather than all of them, thus improving the cache hit rate of the third-party package product.
In addition to the object configuration method, we can also perform more flexible configuration through functions. The default unpacking strategy in Vite is also configured through functions. We can add the following configuration to the implementation of Vite.
// Part of Vite source code
function create MoveToVendorChunkFn( config : ResolvedConfig) : GetManualChunk {
  const cache = new Map< string , boolean> ()
  // The return value is the configuration of manualChunks
  return ( id , { getModuleInfo }) => {
     // The default configuration logic of Vite is actually very simple
    // Mainly to put the Initial Chunk in The third-party package code is packaged separately into `vendor.[hash].js`
    if (
      id.includes('node_modules') &&
       !is CSSRequest( id ) &&
       // Determine whether it is Initial Chunk
      static ImportedByEntry( id , getModuleInfo , cache )
    ) {
      return 'vendor'
    }
  }
}
Rollup will call the manualChunks function for each module. In the function input parameters of manualChunks, you can get the module id and module details. After certain processing, it will return the name of the chunk file, so that the module represented by the current id will be packaged for you. in the specified chunk file. Now let’s try to implement the unpacking logic just now using a function.
manualChunks( id ) {
   if ( id .includes( 'antd' ) || id .includes( '@arco-design/web-react' )) {
     return  'library' ;
  }
  if ( id .includes( 'lodash' )) {
     return  'lodash' ;
  }
  if ( id .includes( 'react' )) {
     return  'react' ;
  }
}
Then, perform the packaging operation, and the results after packaging are as follows.

It seems that the chunks of each third-party package (such as lodash, react, etc.) can be separated, but in fact you can run npx vite preview to preview the product, and you will find that the product cannot run at all, and a white screen appears on the page. This is the pitfall of function configuration. Although it is flexible and convenient, if you are not careful, you will fall into such product error problems.
5. Solve the circular reference problem
From the error message traced back to the product, we can find that there is a circular reference between react-vendor.js and index.js.
// react-vendor.e2c4883f.js
import { q as objectAssign } from  "./index.37a7b2eb.js" ;


// index.37a7b2eb.js
import { R as React } from  "./react-vendor.e2c4883f.js" ;
This is a very typical ES module circular reference scenario. We can use a most basic example to restore this scenario.
// a.js
import { funcB } from  './b.js' ;
 funcB ();
 export  var  funcA = () => {
   console . log ( 'a' );
}
// b.js
import { funcA } from  './a.js' ;
 funcA ();
 export  var  funcB = () => {
   console . log ( 'b' )
}
Next, we execute the a.js file.
<!DOCTYPE html >
< html  lang = "en" >
< head >
  < meta  charset = "UTF-8" >
  < title > Document </ title >
</ head >
< body >
  < script  type = "module"  src = "/a.js" > </ script >
</ body >
</ html >
At this time, an error similar to the following may appear when opening it in the browser.

The following is the execution flow of the code:
- When the JS engine executed a.js, it found that b.js was introduced, so it executed b.js
- The engine executes b.js and finds that a.js is introduced (a circular reference appears). It thinks that a.js has been loaded and continues execution.
- When the funcA() statement is executed, it is found that funcA is not defined, so an error is reported.

Here, you may have a question: Why does react-vendor need to reference the code of index.js? In fact, it is easy to understand. In manualChunks, we only packaged the modules whose path contains react into react-vendor. As everyone knows, the dependencies of react itself, such as object-assign, are not packaged into react-vendor, but into react-vendor. among other chunks, resulting in the following circular dependencies.

So can we avoid this problem? Of course it is possible. The previous manualChunks logic was too simple and crude. It only used the path id to determine which chunk to package into, while missing indirect dependencies. If we target indirect dependencies like object-assign, we can also identify it as a react dependency and automatically package it into react-vendor, thus avoiding the problem of circular references. The solution is as follows:
- Determine the entry path of react-related packages.
- Get the detailed information of the module in manualChunks, trace its referrers upwards, and if the react path is hit, put the module in react-vendor.
Here is the implementation code:
// Determine the entry path of react-related packages
const chunkGroups = {
   'react-vendor' : [
     require . resolve ( 'react' ),
     require . resolve ( 'react-dom' )
  ],
}


// manualChunks configuration function  in Vite manualChunks ( id, { getModuleInfo } ) {
   for ( const group of  Object . keys (chunkGroups)) {
     const deps = chunkGroups[group];
     if (
      id. includes ( 'node_modules' ) &&
       // Recursively search up the referrer and check whether it hits the package declared by chunkGroups
      isDepInclude (id, deps, [], getModuleInfo)
     ) {
      return group;
    }
  }
}
In fact, the core logic of the implementation is contained in the isDepInclude function, which is used to recursively search up the referrer module.
// Cache object
const cache = new  Map ();


function  isDepInclude ( id : string , depPaths : string [], importChain : string [], getModuleInfo): boolean | undefined   {
   const key = ` ${id} - ${depPaths.join( '|' )} ` ;
   // Circular dependency occurs, regardless of
  if (importChain. includes (id)) {
    cache.set ( key, false );
     return  false ;
  }
  // Verify cache
  if (cache. has (key)) {
     return cache. get (key);
  }
  // Hit dependency list
  if (depPaths. includes (id)) {
     // Files in the reference chain are recorded in the cache
    importChain. forEach ( item => cache. set ( ` ${item} - ${depPaths.join( '|' )} ` , true ));
     return  true ;
  }
  const moduleInfo = getModuleInfo (id);
   if (!moduleInfo || !moduleInfo. importers ) {
    cache.set ( key, false );
     return  false ;
  }
  // Core logic, recursively search for upper-level references
  const isInclude = moduleInfo. importers . some (
     importer =>  isDepInclude (importer, depPaths, importChain. concat (id), getModuleInfo)
  );
  //Set the
  cache. set (key, isInclude);
   return isInclude;
};
Regarding the implementation of this function, there are two things that everyone needs to pay attention to:
- You can get the details of the module moduleInfo through the input parameter getModuleInfo provided by manualChunks, and then get the referrer of the module through moduleInfo.importers. This process can be performed recursively for each referrer to obtain the information of the reference chain.
- Use cache whenever possible. Since there are generally a large number of third-party package modules, searching up the reference chain for each module will cause a lot of overhead and produce a lot of repeated logic. Using cache will greatly speed up this process.
After completing the complete logic of manualChunks above, now we execute yarn run build for packaging.
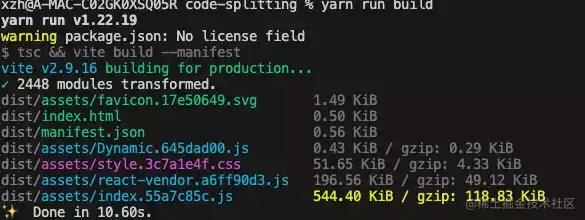
At this point, you can find that react-vendor can be separated normally and view its contents.
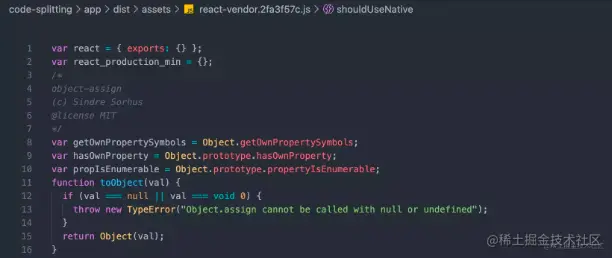
From this you can see that some indirect dependencies of react have been successfully packaged into react-vendor, and the product page can be rendered normally when executing npx view preview.
At this point, we have solved the problem of sequential dependency.
6. The ultimate solution
Next, let me introduce to you the ultimate solution for Vite custom unpacking: vite-plugin-chunk-split. First, we need to install this plug-in.
npm i vite- plugin -chunk- split -D
Then, you can introduce and use it in your project.
// vite.config.ts
import { chunkSplitPlugin } from 'vite-plugin-chunk-split' ;


export default {
  chunkSplitPlugin({
    // Specify unpacking strategy
    customSplitting: {
      //  1. Support filling in package name. `react` and `react-dom` will be packaged into a chunk named `render-vendor` (including their dependencies, such as object-assign)
       'react-vendor' : [ 'react' , 'react-dom ' ],
       //  2. Support filling in regular expressions. All files under components and utils in src will be packaged as
       'components-util' in the chunk of `component-util' : [ /src/ components /, / src /utils/ ]
    }
  })
}
Compared with manually operating dependencies, using a plug-in can be completed with just a few lines of configuration, which is very convenient. Of course, this plug-in can also support a variety of packaging strategies, including unbundle mode packaging.

