


step by step how to customize plug-ins in Vue3
Contents
1. Vue plugin
In Vue, we can directly define some simple functions as global methods, and then hang them on Vue to use them. For example, in vhr, we encapsulate the network request method and then hang it on Vue.prototype. , similar to the following:
import {postRequest} from "./utils/api";

View . prototype . postRequest = postRequest;
Then where it is used, it can be used through this.postRequest.
Friends, please note that this has changed in Vue3. The prototype has been changed to config.globalProperties. That is, if you want to mount global methods in Vue3, it should be in
const app = createApp(App);app.config.globalProperties.useDict = useDictthis form (I will discuss the details with you in the TienChin project. Chat in detail).
This is also a plug-in definition method, but it is generally suitable for some tool methods and cannot define some more complex plug-ins. Complex plug-ins still have to be defined through the plug-in definition method provided in Vue.
2. Custom plug-ins
2.1 Basic usage
First, we create a new directory plugins specifically to store our plug-ins, and then create a new index.js file in this directory to develop plug-ins. The content is as follows:
export default {
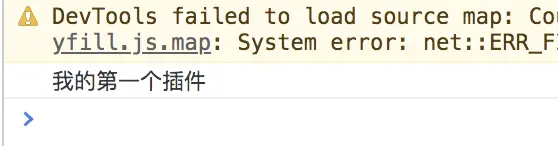
install : ( app, options ) => {
console . log ( "My first plug-in" )
}
};
The methods in install will be executed automatically.
Next we can introduce our plug-in in main.js:
const app = createApp(App);

import plugin from './plugins'

app.use(plugin);
app.use means introducing the plug-in. After the plug-in is introduced, the install method in the plug-in will be automatically executed.
The app.use method receives two parameters. The first parameter is the plugin js object we imported. The second parameter is optional. You can see that the install method when defining the plugin has two parameters. The first parameter is Vue. Instance, this is automatically passed in, and the second parameter options is passed in through the second parameter in app.use. Of course, in the above example, Brother Song did not pass the second parameter.
Okay, after configuring in this way, start the project and you will see logs printed on the console.
Such a plug-in is too simple. Next, we will add some ingredients to this plug-in.
2.2 Add components
First we define a new component as follows:
<template>
    <div>
        <h1><a href="http://www.javaboy.org">javaboy</a></h1>
    </div>
</template>

<script>
    export default {
        name: "MyBanner"
    }
</script>
Then we can now register this component as a global component in the plug-in, as follows:
import MyBanner from "@/plugins/components/MyBanner";

export  default {
     install : ( app, options ) => {
         console . log ( "My first plug-in" )
        app.component('my-banner', MyBanner);
    }
};
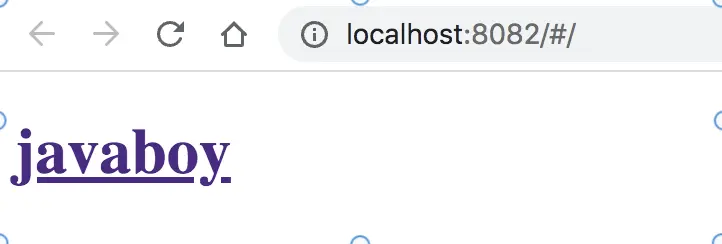
First, import this component in the plug-in, and then register the component through the app. After the registration is completed, we can use my-bannerthe component anywhere in the project, as follows:
<template>
    <div>
        <my-banner></my-banner>
    </div>
</template>
The final display effect is as follows:
2.3 Add instructions
We can even register a command in the plug-in, as follows:
import MyBanner from "@/plugins/components/MyBanner";

export  default {
     install : ( app, options ) => {
         console . log ( "My first plug-in" )
        app.component('my-banner', MyBanner);
        app.directive("font-size", (el, binding, vnode) => {
            var size = 16;
            switch (binding.arg) {
                case "small":
                    size = 16;
                    break;
                case "large":
                    size = 32;
                    break;
                default:
                    size = 48;
                    break;
            }
            el.style.fontSize = size + "px";
        });
    }
};
Now, we can use this command anytime and anywhere in the project, for example, use this command in the my-banner we just customized:
<template>
    <div>
        <h1><a href="http://www.javaboy.org" v-font-size:small>javaboy</a></h1>
    </div>
</template>

<script>
    export default {
        name: "MyBanner"
    }
</script>
We can even dynamically pass in the font size in the command through options, as follows:
import MyBanner from "@/plugins/components/MyBanner";

export  default {
     install : ( app, options ) => {
         console . log ( "My first plug-in" )
        app.component('my-banner', MyBanner);
        app.directive("font-size", (el, binding, vnode) => {
            var size = 16;
            switch (binding.arg) {
                case "small":
                    size = options.small;
                    break;
                case "large":
                    size = options.large;
                    break;
                default:
                    size = options.defaut;
                    break;
            }
            el.style.fontSize = size + "px";
        });
    }
};
options is a JSON parameter passed in when the plug-in is registered. The font size corresponding to small, large and default depends on the value passed in when the plug-in is registered:
const app = createApp(App);

import plugin from './plugins'

app.use(plugin, {small: 16, large: 32, default: 48});
The second parameter, as you can see, is the value of the options parameter.
Now think about it when we usually use ElementUI, the Vue.use method passes in ElementUI, and then passes in some other parameters. After looking at the above example, you will now understand what the introduction method of ElementUI is.
2.4 provide & inject
In the plug-in, you can also provide a method through provide. Where you need to use the method, inject the method through inject, and then you can use it, as follows:
import MyBanner from "@/plugins/components/MyBanner";

export  default {
     install : ( app, options ) => {
         console . log ( "My first plug-in" )
        app.component('my-banner', MyBanner);
        app.directive("font-size", (el, binding, vnode) => {
            var size = 16;
            switch (binding.arg) {
                case "small":
                    size = options.small;
                    break;
                case "large":
                    size = options.large;
                    break;
                default:
                    size = options.defaut;
                    break;
            }
            el.style.fontSize = size + "px";
        });
        const clickMe = () => {
            console.log("==========clickMe=========")
        }
        app. provide ( 'clickMe' , clickMe);
    }
};
Wherever it needs to be used, it can be used after injecting the injection method, as follows:
<template>
    <div>
        <h1><a href="http://www.javaboy.org" v-font-size:small>javaboy</a></h1>
    </div>
</template>

<script>

    import {inject} from "vue";

    export default {
        name: "MyBanner",
        mounted() {
             const clickMe = inject ( 'clickMe' );
             clickMe ();
        }
    }
</script>
3. Summary
Generally speaking, by customizing plug-ins in this way, you can achieve richer content. If you just want to hang a global method for use, there is actually no need to define a plug-in. If you just want to mount a global method, you can use it in Vue2 as follows:
View . prototype . postRequest = postRequest;
In Vue3, you can do this in the following ways:
app.config.globalProperties.useDict = useDict